Outlets on a Log WallWalt: One of the long-term housing projects at Windward involves finishing a log cabin kit that was purchased by one of our founding members. Getting it finished is a long-overdue task, and this winter, while the snow has outside work shut down, is an especially good time to move the cabin along.
Installing electrical outlets in the interior walls is straight forward "stick-built" work, but installing outlets in the exterior log walls isn't so easy. After getting suggestions from a variety of people, the route settled upon was to cut out sockets for the metal boxes, and to run the wiring along the cracks where one log sits upon another.
The first step was to place an outlet box over the crack between two logs, and mark around it with pencil.
What we're creating here is a sort of "mortise" which is a blind pocket. The first step in that process is to use a drill bit to cut away as much of the wood inside the pocket as you can. In this case, a standard spade type wood bit is an easy way to accomplish that.
After the edges and center are defined by holes, then it's just a matter of drilling out as much of the wood as you can sink the bit into. Using a spade bit helps here because the pointy center will enable you to dig into various odd shapes and eat away more of the waste.
The next step involves a strong, sharp chisel. One of the non-intuitive aspects of this sort of work is that sharp tools are safer than dull tools. A sharp chisel cuts easily, no need to press too hard or hammer away with the mallet. A dull tool requires greater force, and all too easily, it can slip doing personal damage.
Another key thing is to have a good mallet, one that you can roll with your wrist rather than swing like a hammer. With a sharp chisel, it's more a matter of tapping the chisel than hitting it.
Following your pencil line, tap out the wood left between the holes, stopping frequently to clear out the chips. There are two steps involved here, the first being to work the chisel with the grain. Often, it won't even be necessary to tap the chisel with the mallet. Just push it in a firm hand, and then rock the chisel to the side. Often that's enough to "pop" off a chip. The second step is to use the chisel to trim across the grain. This takes a bit more force, but it's a mistake to use too much. Better to take the time to make a few more strokes than to try to take too big a bite before popping the chip free.
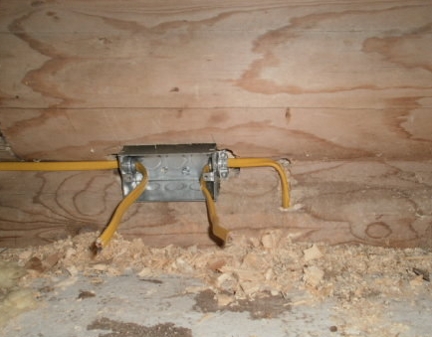
As the mortise gets to the depth you want, take a piece of wood that's long enough to reach from the high point on one log to the high point on the next. That will show whether you've gotten the mortise deep enough. The next step is to secure the metal box in place with a couple of 1" wood screws. Later, when we're doing the trim, we'll add a piece of plywood to create a baseboard that extends down from the middle-point of the log above the box down to the floor.
The next step was to drill out a passage for the circuit wire to come up from the below the floor. It's important to make this deep enough that the wire is always more than an inch and a quarter back from the future baseboard to help ensure that a screw or finishing nail is unlikely to connect with the wire.
With the circuit wire secured in the first box, it's time to run wire from there to the second box. Use enough wire staples to ensure that the wire stays down in the crack between the two logs.
When it's time to run the wire around the corner to the south wall, drill out the seam between the two logs so that the wire can be kept deep enough to be safely back from screws or finishing nails.
The last step is to run the wire to the second box on the south wall.
|