The dining hall's main cooking stove uses propane, as will the on-demand water heater we'll be bringing on line there this fall. For a host of reasons, fire safety being a key concern, the 500 gallon propane tank that serves the dining hall is located about a hundred feet north of the dining hall in an area that will eventually be home to the 1,000 gallon methane generator that will enable us to produce our own "natural gas." At that point we'll no longer need to purchase propane -- but that's a project for another day.
When we installed the gas line we did it in the traditional way; i.e. using 3/4" inch black pipe. The installation was straight forward, and the line worked fine; the problem was that the building inspector felt that the technology had moved beyond doing it that way, that there were better materials available that would last longer.
Tristan hamming it up a bit with the new gas line
Since we're into doing things with a long-term focus in mind, we didn't have a problem with replacing the black pipe with the newer material. I'd note that the building inspectors we've worked with have been very helpful and supportive; this is the first time that we've been asked to make such a notable alteration, and since a bit of investigation revealed that there were indeed newer materials available that offered a much longer working life than black pipe, we were good to go with the change.
The first task was to uncover the existing line and remove it. Considering how big and powerful the track hoe is, it's remarkably capable of doing precision work. Once the overburden was taken off, Virgil and Tristan used shovels to fully expose the gas line and started unscrewing the twenty foot long sections of black pipe.
Once the old line was removed, we started in on installing the new gas line. At each end the yellow plastic gas line connected to a pipe that transitioned from a tube fitting, through a 90° bend to a regular pipe thread. Some teflon tape to seal the threats, some careful work with pipe wrenches, and we soon had the first end of the new gas line connected to the dining hall.
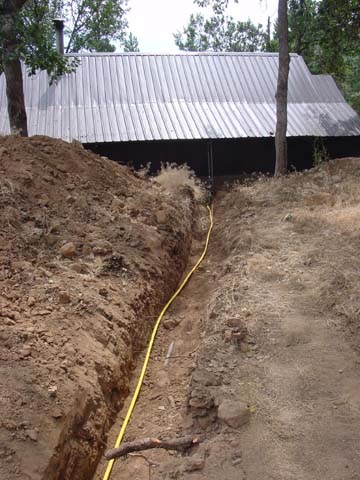
the new plastic gas line running south to the dining hall
From there we rolled out the plastic tubing from the dining hall to the other end of the trench -- about the only thing we had to concern ourselves with was insuring that the tubing didn't get kinked anywhere along the way. Then, just a minute with a hack saw, and the new gas line was in place and ready to the mated up to the other 90° bend pipe assembly.
The design of the plastic pipe to metal fitting was very impressive, and unlike anything we'd worked with before. The first step involved making sure that the end of the plastic tubing was cut square, and that any burrs formed during cutting were removed. Then you laid the tubing against the fitting so that the end of the tubing overlapped the fitting enough that it was parallel to what they called "the fusing ring." You then made a mark on the tube to show how deep you had to push the tubing in to be sure that it had reached all the way to the fusing ring.
The directions made it sound simple, and for once that's exactly how it worked out. Virgil held the fitting while I pressed the pipe inward, rotated it a bit and it slid in place right up to the mark that showed that we were in as far as we needed to go. Virgil and I both looked at each other and remarked, "That was just too easy!"
Katie, Virgil and Jackie take turns testing for leaks
With the ends in place, the next step was to attach the pipe and fittings needed to connect the new line to the dining hall and the propane storage tank -- all that was straight forward, and we were pleased to find that our stash of threaded 3/4" pipe had sections of just the right length. Again, this job was going so easy that we were beginning to feel that we were sure to run into some major problem any minute.
But we didn't. A few minutes with a roll of teflon pipe tape, and we had the union mounted on the dining hall end, and the gas tee mounted on the other. The union joined up to the dining hall, the gas tee took the flexible line from the tank, and we were ready to reopen the valve on the main propane tank to see how things held.
When the valve on the propane tank was opened there was an audible rushing sound as propane entered the new piping and built up system pressure, but in about twenty seconds, all was quiet. At that point we knew we didn't have any major leaks, leaving only the question of whether there were any minor leaks.
the track hoe starts filling in the gas line ditch
With propane, even minor leaks are unacceptable, so it was time for an impropmtu learning moment for the 'terns. When an opportunity to share new techniques comes along we gather the 'terns together and make sure that everyone is brought up to speed on the concept- that way everyone learns instead of just the ones who are directly involved in a given project.
One way to check for a leak is to use a match to see if there's any combustible gas leaking out of the pipe joint; the sort of technique that was immortalized in the ditty that went,
My Bonny leaned over the gas tank,
the height of its contents to see.
I lighted a match to assist her,
Oh, bring back my Bonny to me.
Instead of using such a potentially exciting technique, we choose the duller path of using a half glass of water with a few drops of dish washing determent, and a paint brush. Brushing the soapy liquid on a joint will immediately show if there's a leak because the leaking gas will "blow" bubbles -- the stronger the leak, the more the bubbles.
bringing the fill dirt in close to the dining hall
Once we'd satisfied ourselves that all the new connections were sealed, we went into the kitchen and flushed the line. The gas lines inside the dining hall were filled with propane, while the new gas line was filled with air -- we didn't want the air to have time to mix with the propane and create a combustible mixture, so we took the time needed to flush the air out of the line.
First we turned on and lit one of the gas stove's main burners and waited until the propane already in the lines was exhausted and the flame went out. Then we waited about the same length of time for the air to be purged -- checking periodically to see if the gas coming out of the burner was yet rich enough to sustain a flame. It took a few minutes, but in due time the gas coming out of the burner caught, and shortly thereafter the stove was working as usual again.
So, with the new line checked and flushed, the replacement was complete, and all that remained was to have the track hoe return and cover up the newly installed piping. While we were waiting for the return of the track hoe from a job down in the pasture, Virgil and I raked in a few inches of dirt to cover the newly installed line, mostly to keep it from rising up in the ditch. Iron pipe lays snugly on the bottom of the trench, but plastic line is light and can bounce around as fill dirt is added.
bringing the dirt in even closer
When Rick returned with the back hoe to finish the job, the first thing he did was to fill the two foot deep trench in about half way. With that much dirt covering the gas line, Virgil and I ran a stream of bright yellow "CAUTION" tape from one end of the trench to the other keeping it right above the gas line. That way if some day down the road someone is digging there, they'll come across the caution tape first, and hopefully not dig into the gas line before they know that something significant is down there. Adding caution take to any digging project is a cheap way to avoid an expensive mistake down the road.
With the caution tape in place, Rick quickly finished filling and packing the trench were it crosses the road above the dining hall. Then he started to move and grade the dirt we had dumped there, dirt such as the surplus left over from digging the mini-aquaponics tank, and to steadily maneuver it up against the north side of the dining hall. Not only does that make the area look much more finished, the earth sheltering will also help with keeping the dining hall warm in winter.
a distance view shows the amount of earth sheltering the hall
There's still some work that will need to be done with hand shovel and rake to get the earth tucked back in against the concrete, and there's lots of rocks that we'll want to gather up and haul away before starting the process of converting that area into a edible landscape. That's going to take a lot of compost and effort, but by next spring we expect to be growing saffron, elderberries, oregon grape and rugosa there.
The last pic shows the way the earth is sloped to move water away from the dining hall. The uphill side of an earth-sheltered building has to be protected from the build up of hydrostatic pressure that could force water through tiny cracks in the retaining wall. That's why there's a drainage ditch buried at the bottom of the wall, and why the ground is sloped away from the building. With this extra thermal shielding the dining hall will be even more warm and cozy this winter.