Building the New Workshopputting up the "pole barn" frame
the wood shop that was
 |
| |
As you can see, last winter's heavy snowfall took out our temporary woodshop. Surveying the damage, we came to the conclusion that it was time to construct something more substantial, something which would allow us to work through the winter and demonstrate some of the renewable technology which will be a key part of our work in the years to come.
Standard stick construction involves putting together a building from the bottom up. You start by preparing a foundation, then put in a floor, erect the walls and finally build a roof. There are sound economic reasons why most commercially built structures are done that way, but once you stray off the beat path, and start to look at "owner-built", then that's where "pole barn" structures start to make more sense.
For example, if you wanted to build a straw bale building, you could either rest the roof on the stack of straw bales, a plan which will set off all sorts of alarm bells down at the county's plan review office. Alternatively, you could put up a pole barn, and just use straw bales to create the now-non-load-bearing walls. The first plan will be very difficult to get approved, whereas the second won't hardly raise an eyebrow.
drilling the holes for the poles
 |
| |
The pole-barn-route also offers the very real advantage of being able to do most of the work under roof. Since your tools and the work-in-progress stay dry, the owner-builder can stretch the work out as time and funds allow without risking weather damage.
We've built a number of the pole barns on site, but this time, in order to move things along, we elected to bring in a local construction crew to put up the basic 40' wide by 20' deep pole barn. Ken Ingebo, of Ingebo Construction, put up our hay barn a few years back, and we were very pleased with the work they did, and especially with how fast they did it. Ken said that this pole barn was the 720th that they'd put up, a wealth of experience which made their work seem more like a dance than a job.
Pole barns get their lateral strength by virtue of the poles being set down into the ground. The deeper the set, the stronger the building's resistance to the horizontal loading caused by the wind.
Using a pair of hand operated post hole diggers, it's difficult to go down more than three feet - but using Ken's special drilling truck, it's quick and easy for to set the posts at a very secure four feet down. Once the hole is cleared of lose dirt, the bottom of the hole is filled with concrete. Once hardened, that will spread the load around thereby preventing the weight of a heavy snow load from driving the pole further down into the ground.
four feet deep and ready for the pole
 |
| |
Ken's crane truck allows him to put each "bent" together on the ground, and then just lift and lower into the holes. If someone were building this by hand, then they'd have to put each pole in one-at-a-time, and then work above ground to create the trusses. That can be done, and it's how we do the smaller pole-barns like the one we're constructing to hold the kitchen's wood supply, but Ken's way is quicker, safer and sure is fun to watch.
One thing that's not evident in these pictures is the attention to detail that Ken puts into getting the holes dug in exactly the right place and to exactly the right depth. An owner-builder would just use poles that were tall enough that they could be trimmed to the right heighth after the rafter joists were bolted into place, but since these bents are assembled first, the dimensions need to be right on the money the first time.
The technique I use to get the poles parallel is to just put in one pole to start. I get both sides of that pole perfectly vertical, and then cement it in place. Once the cement is hard, I use that pole as the standard to which I allign all the other poles. It's a proceedure that takes a bit more time up front, but it sure saves a lot of time down the road since I don't have to make allowances later on in order to get things like siding and windows to fit true and snug.
Ken moves the middle "bent" into place
 |
| |
Ken gets his accuracy by using a rotating lazer on a tripod. It creates a plane of light that can be accessed from any place within the building area to precisely determine how deep each hole is, which in turn tells him how high up the pole the roof joists need to go. While it doesn't do anything that couldn't be done with an old-fashioned water level, it sure is a whole lot faster.
|
water level - lasers are high-tec and very handy, but the traditional method still works fine albeit slower. Water always seeks it's own level, a process that can be used to make low-cost determinations over substantial distances.
The device consists of two pieces of clear, plastic tubing attached to hose fittings, one male, one female, and a hose that's as long as you need it. First determine some primary reference point that central to the area you want to chart. A nail set into a poles some four feet above what looks like the highest point of the building works fine.
Then take the other end of the water level to some other pole that needs to be vertically alligned with the first pole, and mount the clear plastic tube at an elevation that's approximately level with your reference point.
Now, fill up the hole with water until the water rises up to the point that it's even with your reference point. Wait for the water to settle down, and when it's at rest, you can note the level of the water at the other end by putting a nail in that pole at that heighth and be assured that an imaginary line running between both nails would be perfectly level.
I use the term "imaginary line" to note that a real line has actual weight and sags in the middle. Lasers don't sag, but they're only as true as the built-in level that's used to level the level. With a water level, there's no question that the two points fall in a level plane.
The way Ken's fancy laser on a tripod gets around that is by incorporating a design by which the laser floats internally and is able to seek true level. A way for a person on a low budget to duplicate that is to use one of the relatively inexpensive laser levels available, the ones that look like a traditional bar-style level, an eight inch length of 2"x8" and a bucket of water.
First, set the bucket in the center of the area you want to calibrate and fill it with water. Float the wooden square in the bucket and then set the laser level on the wood. All you have to do is rotate the block of wood to point to each location you want to calibrate, and drive your marker nail in where the lazer's red dot hits the pole.
|
You'll notice that the sides on the shop are ten feet tall. That's so that we can incorporate a two-foot band of clear plastic under the eves all around the building in order to allow natural light into the work area - sort of like a band of skylights all around the sides of the building. Not only is natural light more pleasant to work under, it helps keep down the cost of operating the building since the more light that comes in, the less lights you need to operate.
It's always important to remember that while it's good to be able to generate renewable energy to meet your needs, it's far better to not need to generate that energy in the first place. Passive design isn't as "sexy" as solar panels and steam engines, but it's always the best way to go if at all possible. Often the best sustainable techniques are the ones that the casual observer is least likely to notice.
Murphy's Law, that if something can go wrong it will, and usually at the most inconvenient time, is an inherent part of any system, but it pretty much only applies to active components. With passive designs, there's very little room for Murphy to get a grip on what you're doing.
At this point in the construction, you can start to see the building really take shape. "The Plan" is to incorporate three separate work areas. The 16'x20' center pay is intended to house our wood working equipment such as the table saw, radial arm saw, wood lathe, bandsaw, planer, joiner, shaper, drill press, etc.
The western side bay, a space that's 12'x20', will be home for metal working equipment such as the metal lathe, finger break, notching shear, rolling break, box punch as well as our various welding machines such as the 250 amp, water-cooled heliarc and our more pedestrial wire-feed unit. All in all, we have six different types of welding machines, and it's going to be great to finally have an actual shop to get them set up in. It's frustrating to not have the tools one needs to do the job, but in some ways it's even more frustrating to have the tools stored away and lack the appropriate work space needed to set them up.
The eastern bay will be set aside for assembly and finishing. One of the product lines we're developing involves a type of picture frame made from salvaged wood - what we call our "Blued Pine" product line. When one of our pines dies, a fungus takes over that dyes the wood a faint blue color. It's actually rather attractive, and we strive to preserve and highlight the effect to show that a given product was made from salvaged wood. Sort of our way of saying that "No living tree was harmed in order to make this picture frame" :-)
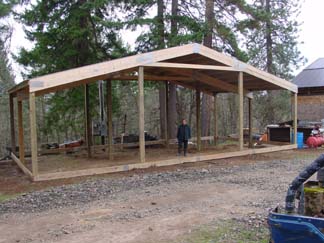
all three "bents" in place -
now it's time to put on the metal roof
 |
| |
The new workshop, like all our buildings, will get a brown metal roof. The metal is good at sheding snow, and that's a plus, but the key reason for a metal roof is to insure that the building won't burn when a forest fire comes through. [Careful readers will note that I didn't say "if" but rather "when."]
Fire is part of the ecology of forested land, at least in this part of the country; that which can't be avoided must be prepared for, and the most important step in that process is to make sure that you have a roof that won't burn. About ten years ago, a neighbor's mobile home caught fire and burned to the ground. It was quite a sight to see the embers from that fire coming down on the metal roof of a nearby barn, and then sliding down the metal roof panels just like rain. Sure made a believer out of me.
The metal roofing is screwed down with special fasterners that incorporate a rubber washer. The result is a very secure, water-tight roof that won't come loose in a heavy wind. We don't get a lot of wind here, but over time even the occassional storm will tend to work nails loose - but the screws don't budge a bit.
Ken and his crew started the work at eight in the morning, and by four in the afternoon, they were loading their tools back on the truck and getting ready to head home.
There's a saying that you can get work done fast, you can get work done right and you can get work done cheap - you just can't get all three in the same job. For example, work that's done quick and on the cheap is rarely very good. So too, you can get work done right and done quickly, but you need to be prepared to pay a substanial price for work done like that.
Terry checks out the finished pole barn
 |
| |
Ken's work is first rate, and he certainly gets the job done as quickly as one can imagine, but he's not cheap. On the other hand, economy comes in more than one form, and it's too easy to fall into the trap of placing price ahead of quality. All in all, Ken's work comes pretty close to getting all three qualities in one job.
The next task will involve preparing the inside to take the three hydronic slabs. The site is fairly level, although it look a lot more level before the building went in. Now that we have level truly set, it's evident that the ground falls away more than a foot from the front to the back. That's going to require a good deal of fill and tamp before we'll be ready to pour any concrete, but now that the building's in, we can deal with that once a few other tasks are attended to.
This is the time of year to dig, now that the ground has dried up enough that our clayish soil won't stick to the equipment, but is not yet so dry that the clay content makes for hard digging. The next task we're taking on involves digging three eighth's of a mile of ditch so that we can lay in a non-potable water line from the dug well down in the pasture to the herb garden at the top of the hill, but more on that in due time.
Notes From Windward - Index - Vol. 64
|